
Zeroing My Thermal Scope: Tips for Maximum Accuracy
Oct 21st 2025
Mastering Your Thermal Riflescope: The Definitive Guide to Pinpoint Accuracy
Zeroing your thermal riflescope is the critical step that aligns your aiming point with where your rounds strike, ensuring predictable first-shot success. This guide dives into the unique mechanics of thermal zeroing - from sensor mapping and reticle presentation to features like freeze-frame capture and provides practical workflows for unwavering accuracy. Many shooters grapple with thermal-specific challenges like fluctuating thermal contrast, NUC cycles, and managing multiple zero profiles; this article tackles those pain points head-on with clear, step-by-step instructions, target recommendations, and expert troubleshooting. You'll learn how to set up your range, select or craft effective thermal targets, master both traditional multi-shot and one-shot freeze zeroing techniques, and implement best practices for maintenance and environmental awareness.
We'll cover: the fundamentals of thermal scope zeroing, essential preparation and optimal scope settings, detailed zeroing methodologies, target options (both commercial and DIY), advanced considerations like profiles and ballistics, common error resolution, and Armasight-specific maintenance tips tied to battery and firmware care. Throughout, we'll emphasize key terms such as thermal scope zeroing, POA POI alignment, one-shot zeroing thermal scope guide, and thermal target best practices to ensure precise, actionable learning.
What Exactly Is Thermal Scope Zeroing and Why Is It Crucial for Accuracy?
Thermal scope zeroing is the precise adjustment of windage and elevation to align your thermal reticle with your rifle's Point of Impact (POI), leveraging the thermal sensor and reticle mapping for consistent on-target hits. This alignment works by translating sensor pixels into display coordinates, with the reticle calibrated to this mapping, ensuring that accurate zeroing translates directly to repeatable shot placement across your intended engagement distances. The primary advantage is dependable first-shot accuracy, especially in conditions where thermal contrast, low light, or sensor processing might otherwise compromise aiming. Zeroing also compensates for mounting parallax and ballistic drop, providing a solid foundation for holdovers or ballistic calculator inputs in operational scenarios. Consequently, proper zeroing builds confidence and ensures predictable performance, whether you're hunting, engaged in security operations, or validating a course of fire, setting the stage for equipment preparation and range procedures.
How Do Point of Aim and Point of Impact Influence Zeroing?
Your Point of Aim (POA) is where your reticle indicates you're aiming, while the Point of Impact (POI) is where your bullet actually lands. Zeroing bridges the gap between these two by adjusting the reticle relative to the sensor and mount, effectively minimizing the POA - POI offset. Because thermal reticles are rendered over a processed image, sensor mapping and any parallax between the sensor plane and optical axis can introduce apparent offsets. Zeroing corrects these by using measured group centers and adjusting elevation and windage in precise clicks or MOA/minor units. For instance, a 1-inch POA - POI offset at 50 yards translates to a specific number of turret clicks, depending on your scope’s click value, converting the measured offset into a mechanical adjustment. Understanding this relationship empowers you to quantify adjustments accurately and ensure your reticle calibration truly reflects ballistic impact, preparing you to consider how thermal-specific factors might modify perceived alignment.
What Sets Thermal Scope Zeroing Apart from Day Optics Zeroing?
Thermal scope zeroing differs significantly from daylight optics because thermal devices interpret heat contrast rather than reflected light, often incorporating image processing, Non-Uniformity Correction (NUC), and digital reticle overlays, all of which can influence target appearance and perceived centering. Sensors respond to scene temperature, meaning target contrast can fluctuate with ambient temperature and target emissivity. A thermal reticle might appear to shift slightly when the sensor performs a NUC or as the sensor temperature stabilizes. These mechanisms necessitate the use of thermally consistent targets and careful attention to freeze or capture functions that lock a thermal image for one-shot zeroing. Recognizing these distinctions guides different preparation and validation steps compared to day optics, leading directly into the specific preparation checklist that follows.
How Does Achieving Proper Zero Enhance Shooting Accuracy?
Proper zeroing establishes a reliable correlation between your reticle marks and projectile impact, enabling shooters to apply precise holdovers and corrections with confidence, directly boosting first-round hit probability and group consistency. Once your zero is established, ballistic compensations derived from calculators or holdover tables translate accurately to the field, tightening group sizes and minimizing the need for corrective follow-up shots. Practical examples include hunters making ethical first-shot kills at known distances and law enforcement officers relying on predictable POI for risk-managed engagements; in both scenarios, a validated zero reduces cognitive load and sharpens shot selection. Maintaining that zero through diligent mounting, upkeep, and environmental checks ensures the long-term benefits of accuracy, naturally leading into how to prepare your range and equipment.
How Do You Prepare for Accurate Thermal Riflescope Zeroing?
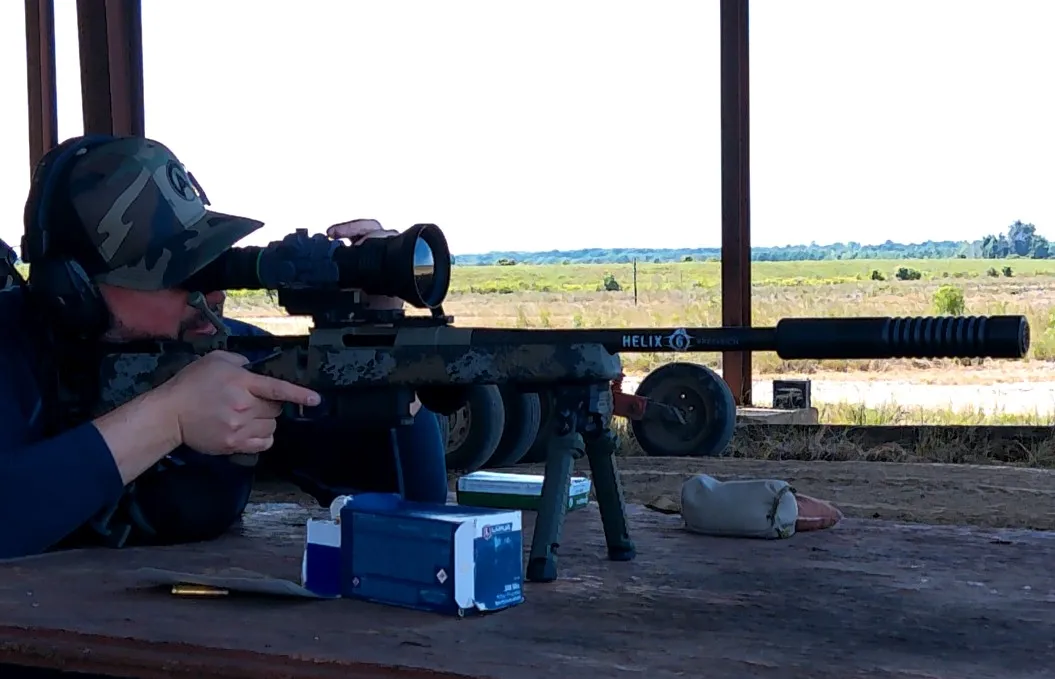
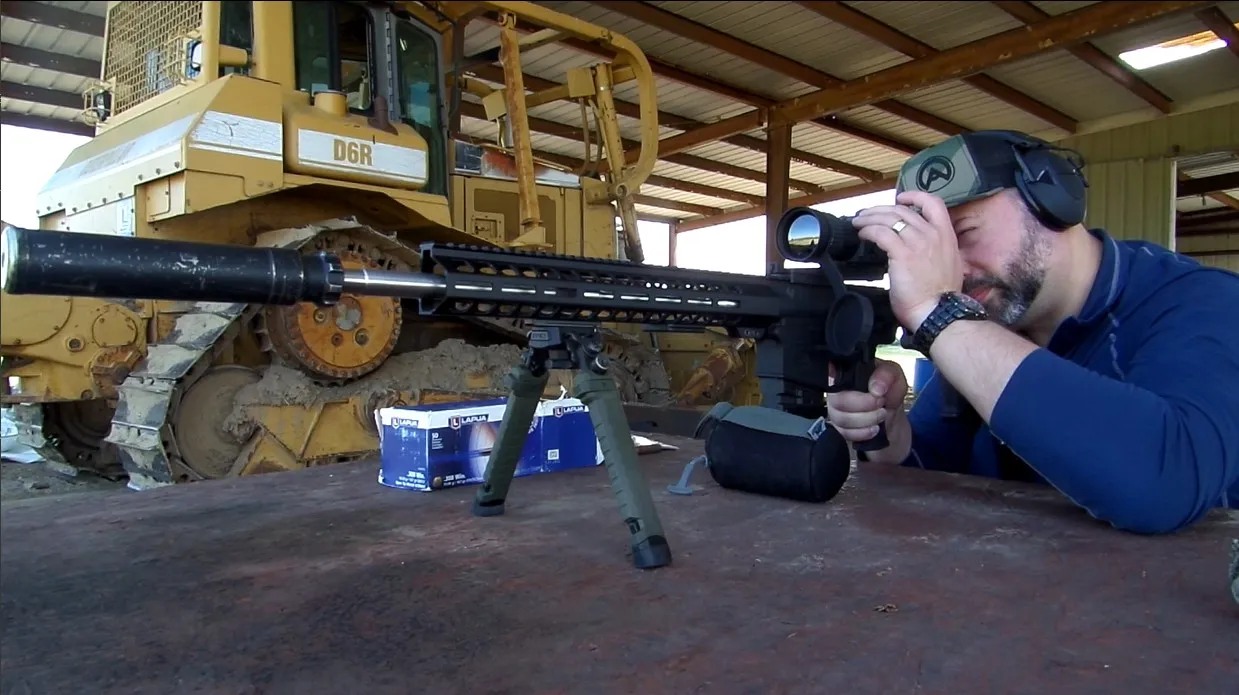
Preparing for thermal riflescope zeroing involves gathering the necessary equipment, stabilizing your shooting platform, and configuring scope parameters to ensure the sensor, reticle, and mount are in a predictable state for adjustments. The underlying principle is to eliminate variables - unstable rests, inconsistent ammunition, unsettled electronics, so that any measured POA - POI offsets accurately reflect true ballistic deviations rather than user or gear inconsistencies. The tangible benefit is faster, more accurate zeroing sessions with fewer rounds expended, providing a reliable baseline for subsequent profile creation or ballistic calculations. Thorough preparation minimizes rework and clearly indicates whether subsequent POI shifts stem from environmental or mechanical causes. With the right kit and setup, you can confidently proceed to the step-by-step zeroing methods.
What Essential Equipment Is Needed for Effective Zeroing?
Key equipment for thermal zeroing includes a stable rifle platform, consistent ammunition, a thermal-capable target, a reliable rest, and a method for accurately measuring distance and maintaining precise repeatability during group firing. Optional tools that significantly enhance results are a rangefinder, chronograph, spotting scope, and an adjustable bench rest to isolate shooter input from equipment variables. Consistent ammunition and proper bore-sighting (if desired) save adjustment time by ensuring initial groups are representative of true impact. Having these items ready before you begin allows you to concentrate on reticle adjustments rather than compensating for poor stability, naturally leading into range layout and safety considerations.
The following list details mandatory and recommended supplies for thermal zeroing:
- Mandatory: Rifle, thermal riflescope, consistent test ammunition, and a visible thermal target.
- Recommended: Stable bench rest or bipod, sandbags, rangefinder, and spotting scope.
- Optional: Chronograph, brass catcher, and environmental meter for temperature/humidity readings.
A well-prepared equipment list accelerates setup and reduces wasted ammunition; the next crucial step is arranging a safe, repeatable range environment to leverage that equipment.
How Should You Set Up Your Range and Ensure Safety?
An optimized range setup positions the shooter, target, and backstop along a consistent line, incorporating an adequate safety buffer and minimizing obstructions to ensure clear thermal signatures and recoverable shots. Select distances appropriate for your intended zero - common practice distances include 25, 50, and 100 yards/meters, depending on the firearm and ballistic trajectory and confirm the backstop can safely stop rounds at those distances. Position targets with distinct thermal contrast, avoiding direct sunlight or backgrounds that create confusing heat signatures. Arrange the rest and shooter position to manage recoil consistently. A deliberate range layout minimizes variables, allowing you to focus on true POA–POI adjustments, which leads into setting optimal scope parameters.
What Are the Optimal Scope Settings Before Zeroing?
Before initiating zeroing, allow the thermal scope to warm up to its operating temperature, ensure batteries are fully charged or fresh, and adjust display brightness and contrast to levels that clearly define the reticle and target edges without oversaturation. Set the diopter and eye relief for a crisp reticle image, select the reticle type and size best suited for your holdover requirements, and disable any non-essential image overlays that could obscure precise centering. Be mindful of NUC timing; either perform a NUC before shooting or utilize a freeze/capture function for one-shot methods. Confirm that your firmware is up-to-date and the unit has reached thermal stability. These baseline settings guarantee a stable and repeatable image for zeroing, preparing you to execute your chosen zeroing method.
What Are the Step-by-Step Methods to Zero Your Thermal Riflescope?
Zeroing methods generally fall into two primary categories: traditional multi-shot zeroing, which involves firing groups and making iterative adjustments, and one-shot freeze-function zeroing, which captures a stable thermal image to compute the necessary adjustment. Both methods achieve the same objective - aligning POA and POI - but through different mechanisms: averaging multiple shots versus correcting based on a single captured point. Understanding both methods allows you to match your workflow to the specific context, whether it's bench precision or rapid field recalibration. Detailed procedures for both methods are provided below, along with a concise comparison to aid in selecting the most appropriate approach.
How to Perform Traditional Multi-Shot Zeroing with Thermal Scopes?
Traditional multi-shot zeroing involves firing several controlled shots to form a group, measuring the group center's deviation from the POA, and applying mechanical turret adjustments until the POI and POA converge. Begin by bore-sighting or roughly aligning the optical axis, then fire a three- to five-shot group from a stable rest at your chosen distance. Measure the center of the impact group relative to the reticle and convert that offset into turret clicks using your scope’s click value. Adjust elevation and windage, fire a confirmation group, and repeat until you achieve your desired accuracy standard, typically a 1 to 2 inch group at 100 yards for field zeroes or tighter for precision work. Confirm your zero after the scope cools or is re-mounted, and meticulously document your turret positions. This iterative method prioritizes verified accuracy and naturally leads to comparing alternative techniques.
| Method | Time Required | Accuracy | Equipment Needed |
|---|---|---|---|
| Traditional multi-shot | Moderate to long | High (bench) | Stable rest, multiple rounds, measurement tool |
| One-shot freeze | Short | Moderate to High (if done correctly) | Freeze-capable scope, single target, stable rest |
| Bore-sighting (initial) | Short | Low precision | Laser bore sighter or visual alignment |
This comparison highlights that traditional multi-shot zeroing offers high verified accuracy at the expense of time and ammunition, while one-shot freeze is ideal for rapid field adjustments.
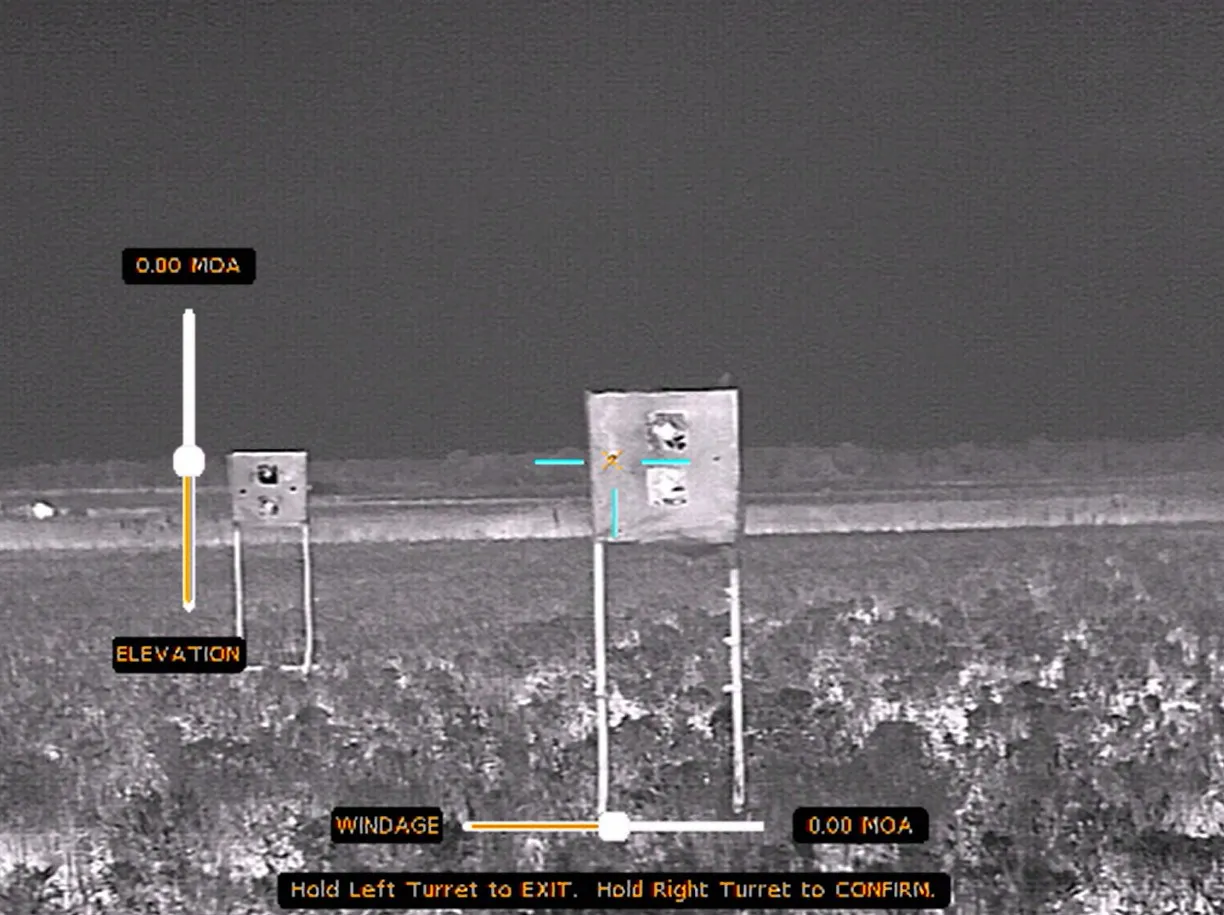
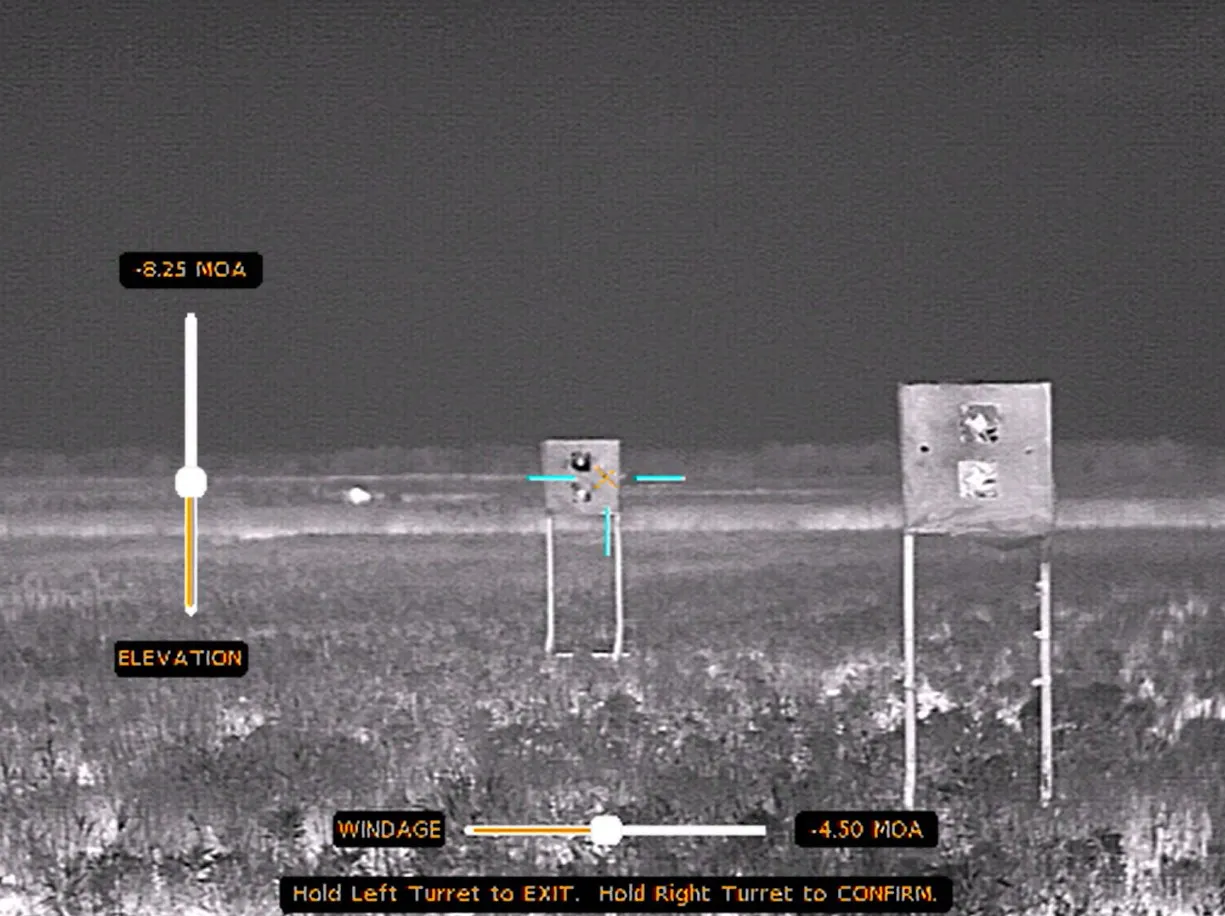
How Does One-Shot Zeroing Work Using the Freeze Function on Armasight Scopes?
One-shot freeze zeroing captures a stable thermal frame - locking the image and reticle - allowing you to place a single aimed shot. You then use the captured POI to compute the necessary adjustment without repeated firing, effectively minimizing variables introduced by sensor processing during live NUC cycles. On Armasight models equipped with a freeze function, the workflow is as follows: warm up the unit, aim at a thermal target, activate freeze or capture to lock the image, take a confirmed shot while maintaining the exact same aim point, and then read the POI offset on the frozen frame to apply turret corrections. Best practices include using a rigid rest, consistent ammunition, and ensuring the freeze capture occurs when the sensor is thermally stable. This method yields rapid zeroing when time or ammunition is limited. Users appreciate that this technique trades multiple shot averaging for speed while still leveraging the thermal sensor’s captured state.
One-shot freeze benefits and workflow steps:
- Freeze image: Lock a stable thermal frame to eliminate NUC-induced shifts.
- Aim and fire: Maintain the exact POA on the frozen image and shoot one controlled round.
- Measure and adjust: Use the frozen display to measure POI offset and adjust turrets.
Utilizing the freeze function reduces NUC variability and enables a swift zero; you should always confirm with a verification group when feasible.
When Should You Use Each Zeroing Method for Best Results?
Opt for multi-shot zeroing when precision is paramount - for bench work, load development, or documenting a permanent zero - as statistical averaging reveals consistent POI across multiple rounds. Employ one-shot freeze zeroing when time, ammunition, or environmental stability is constrained, such as for a field re-zero, or when your scope’s freeze function effectively mitigates sensor-processing variability. This method is highly practical for tactical scenarios or on-the-move corrections. Consider user experience: novices typically benefit from multi-shot procedures with more confirmation rounds, while experienced operators often rely on freeze for efficient recalibration. Align your specific use-case (hunting, tactical, precision) with the appropriate method to optimize the trade-off between time and accuracy, and to prepare for necessary verification steps.
| Zeroing Method | Characteristic | Use-case Suitability |
|---|---|---|
| Multi-shot | Averaging, higher ammo use | Precision bench-zero, load development |
| One-shot freeze | Fast, relies on stable capture | Field re-zero, rapid tactical adjustments |
| Bore-sighting | Quick alignment | Initial setup before live fire |
This decision table clarifies which method best aligns with your operational constraints.
Which Thermal Targets Are Best for Zeroing Your Thermal Scope?
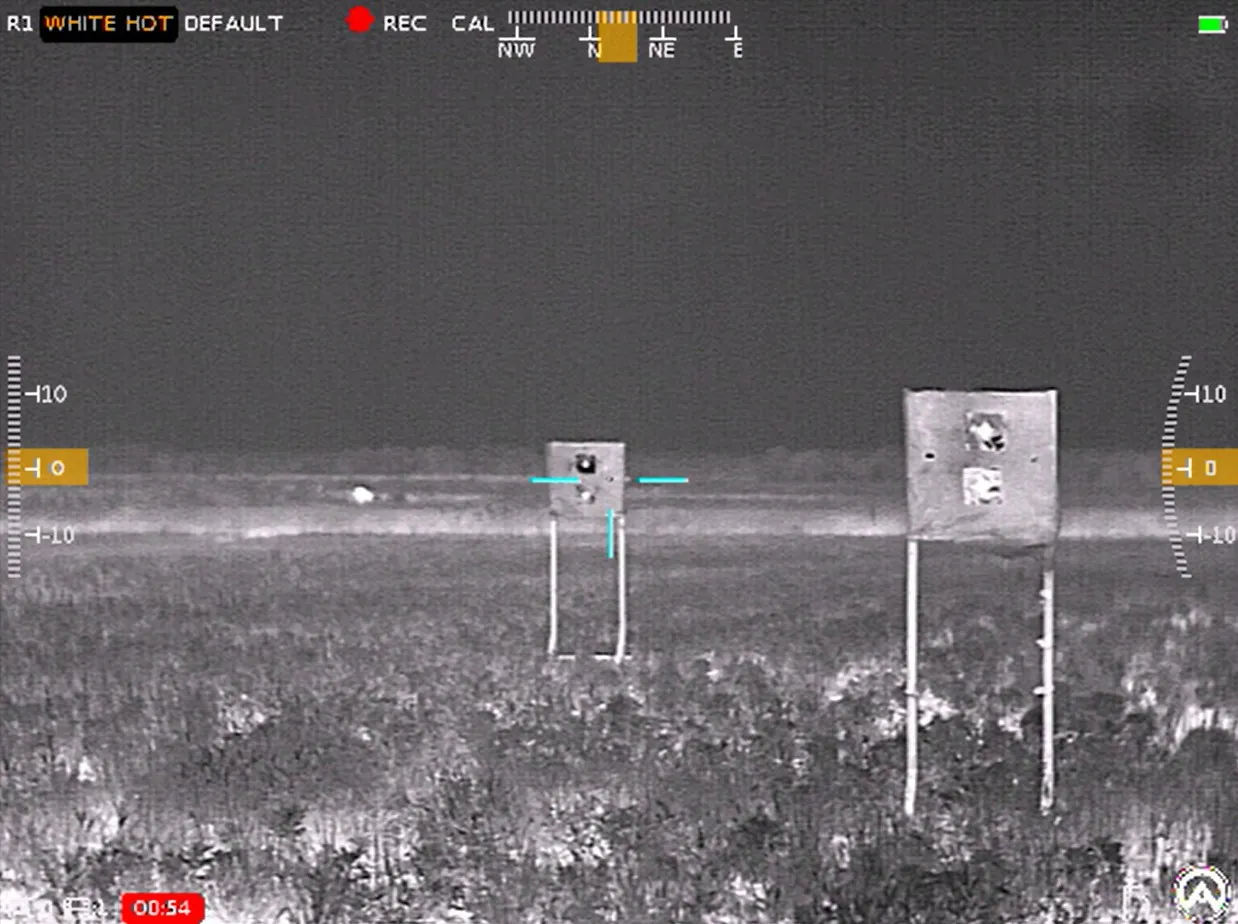
Thermal targets must present stable emissivity contrast and a clear outline to allow precise centering of the thermal reticle, creating a distinct POA reference that the sensor reliably detects at your zeroing distance. The underlying principle is thermal contrast: targets that generate consistent heat signatures or differential emissivity provide clear edges for precise centering, thereby improving measurement accuracy. Selecting the right target minimizes measurement noise caused by transient heat sources and enables accurate POI determination, influencing whether you choose commercial engineered targets or craft DIY options. The following sections compare recommended commercial choices, practical DIY builds, and how target properties impact accuracy.

What Commercial Thermal Targets Are Recommended?
Commercial thermal targets are engineered to maximize emissivity differences and sustain thermal contrast over time, offering predictable performance and durability. They typically feature heated patches, polymer targets with heat-retaining inserts, or purpose-built thermal aim points. Look for targets exhibiting consistent thermal retention, robust construction, and portability. Higher-end engineered targets often provide repeatable outlines at longer ranges and withstand wind and weather effects. Recommended features include defined center markers, modular mounts, and materials with known emissivity that display clearly at typical zero distances. Choosing a quality commercial target expedites zeroing and reduces the need for frequent re-creation, leading into DIY alternatives for budget-conscious shooters.
| Target Type | Heat Contrast | Cost | Portability |
|---|---|---|---|
| Heated patch / pad | High | Moderate | High |
| Engineered thermal target | Very high | High | Moderate |
| DIY hand-warmers/foil | Variable | Low | High |
This comparison indicates that engineered targets deliver the most repeatable results, while DIY options are economical and portable.
How Can You Create Effective DIY Thermal Targets?
DIY thermal targets utilize materials that generate a stable heat differential, such as disposable hand warmers placed behind aluminum foil, heated metal plates, or cardboard with an insulated backing to stabilize emissivity. The mechanism involves creating a consistent edge temperature that the thermal sensor can reliably recognize. A common approach is to affix a hand warmer behind a dark foil bullseye, creating a clear hot spot framed by cooler surroundings, and securing the assembly to a rigid backing to prevent movement. Ensure safety by insulating hot elements from combustible backings and using non-flammable mounting materials. Maintain repeatability by replacing disposable warmers on a schedule and documenting target orientation. Effective DIY targets allow for rapid field zeroing and are particularly useful at short distances where engineered targets may not be readily available.
DIY thermal target materials and assembly steps:
- Materials: Aluminum foil, disposable hand warmers, rigid backing board, tape.
- Assembly: Secure hand warmer behind foil bull, attach to backing, and confirm thermal outline.
- Safety: Use non-combustible backing and replace warmers between strings for consistency.
DIY options offer flexibility and low cost, but a consistent heat source is essential for accurate zeroing.
How Do Different Targets Affect Zeroing Accuracy?
Target temperature contrast, size, and shape significantly influence perceived reticle centering and the precision of POI measurement, as low contrast or indistinct edges increase measurement error and perceived reticle bias. Smaller, high-contrast targets provide precise centering at short to medium ranges, whereas larger targets are easier to center at longer distances but can obscure small POI offsets. Transient heat sources, like sun-warmed metal, can create misleading edges. Recommended pairings include small high-contrast targets for 25-50 yard zeroes and larger engineered targets for 100+ yard confirmation. Always ensure target stability and repeatability to prevent introducing measurement noise. Understanding these effects helps you select or construct targets that align with your zeroing distance and accuracy objectives.
What Advanced Factors Affect Thermal Scope Zeroing Accuracy?
Advanced factors such as multiple zero profiles, environmental impacts (temperature, humidity), and ballistic calculator integration can materially influence thermal zeroing accuracy and operational performance. These factors operate by altering either the sensor image (thermal contrast and drift) or the ballistic path (air density, velocity), so recognizing and mitigating them preserves POI stability. The practical benefit is the ability to adapt zero settings to different ammunition, distances, or environmental conditions while maintaining a validated baseline. The following subsections detail profiles, environmental impact, and calculator usage with corresponding mitigation recommendations.
How Do Multiple Zero Profiles Improve Versatility?
Multiple zero profiles are stored reticle and turret presets that allow you to recall distinct zero configurations for different ammunition types, ranges, or mission sets, enabling rapid switching between validated offsets without re-zeroing. For example, you might store a 100-yard profile for supersonic rounds and a separate short-range profile for subsonic loads, each with descriptive names and verification notes. Creating profiles involves documenting distance, ammunition, environmental conditions, and turret settings, followed by validation with confirmation groups. Protect your profiles by backing up device memory if supported. Multiple profiles enhance field versatility and reduce downtime, naturally leading into environmental considerations for when re-verification becomes necessary.
| Factor | Effect on POI/Reticle | Recommended Mitigation |
|---|---|---|
| Temperature shift | Thermal contrast change, minor sensor drift | Zero at expected operating temperature; verify in situation |
| Humidity / air density | Ballistic trajectory change | Use ballistic calculator with inputs for density |
| Mount torque | Sudden POI shift | Check and torque mounts to spec; re-zero after remount |
| Firmware/NUC | Display/processing changes | Keep firmware current; perform NUC and verify zero |
This EAV table summarizes how environmental and equipment factors impact zeroing and outlines recommended mitigation strategies.
How Do Environmental Conditions Like Temperature and Humidity Impact Zeroing?
Ambient temperature and humidity influence both thermal contrast and ballistic behavior. Temperature affects the sensor’s perception of scene contrast and may alter NUC performance, while humidity and air density change bullet drag, consequently affecting POI at distance. The practical implication is that zeroing in conditions significantly different from those expected during use can introduce POI discrepancies when deployed. For instance, a zero established in cold, high-contrast conditions might shift in warm, low-contrast environments. Mitigation strategies include performing zeroing close to the anticipated operating temperature, re-verifying zero after substantial weather changes, and meticulously recording environmental conditions when creating profiles. These steps minimize surprises in the field and set the stage for effectively utilizing ballistic calculators.
Can Ballistic Calculators Enhance Thermal Scope Zeroing?
Ballistic calculators translate ballistic inputs, bullet Ballistic Coefficient (BC), velocity, environmental conditions, into precise holdover or turret values. They significantly enhance zeroing by providing accurate elevation corrections, particularly for longer ranges where minor environmental variations can accumulate. Calculators require precise inputs (chronograph velocity, BC, sight height, density altitude) to ensure reliability. When combined with a validated zero, they yield actionable firing solutions rather than guesswork. For thermal scopes, integrate calculator outputs with your reticle subtensions or turret clicks and empirically test the results. Understand their limitations for short-range thermal hunting, where minute ballistic inputs have less impact than sensor contrast. Properly utilizing ballistic calculators improves long-range accuracy and complements profile-based workflows.
How Do You Troubleshoot Common Thermal Scope Zeroing Issues?
Troubleshooting systematically identifies the causes of POI shifts, inconsistent groups, and apparent calibration errors, enabling you to apply corrective actions that restore zero stability. The underlying mechanism is systematic elimination: isolate shooter variables, ammunition factors, and equipment faults to pinpoint the root cause. The benefit is reduced downtime and more reliable long-term accuracy by addressing mechanical, electronic, or environmental sources of error. Below are common symptoms and diagnostic steps to resolve them.
What Causes Point of Impact Shifts and How Can You Fix Them?
POI shifts typically originate from ammunition inconsistency, mount torque loss, barrel harmonics, or internal scope faults. Environmental shifts can also cause apparent changes in POI through altered sensor output. Begin troubleshooting by examining ammunition: test with a fresh, consistent lot and confirm velocity with a chronograph if available. Inspect mount hardware and torque mounts to specification, and re-check rail alignment. Perform a controlled rest confirmation group to determine if the shift is shooter-induced. If mechanical checks pass, evaluate scope behavior: perform a NUC, check for erratic reticle movement, and consider firmware-related issues before contacting technical support. These steps prioritize the most common and easily rectified causes before delving into deeper diagnostics.
Common causes and immediate fixes:
- Ammunition variability: Test with the same lot and confirm group consistency.
- Mount/slip: Check torque and re-seat mount; verify rail integrity.
- Scope electronics: Execute a NUC, verify firmware, and test freeze function stability.
Resolving these issues often restores POI consistency and indicates whether further repair or re-mounting is necessary.
How to Address Inconsistent Shot Groups During Zeroing?
Inconsistent groups can stem from shooter technique, unstable rests, or ammunition and barrel condition. Isolating each variable helps identify the true source of dispersion. Start by eliminating shooter error: utilize a rigid bench rest or vice, employ remote triggers, and verify consistent sight picture and trigger control. If groups remain inconsistent, sample multiple rounds from the same lot to rule out ammunition issues. Inspect the barrel for fouling and ensure the rifle’s bedding and action screws are secure. After isolating equipment and shooting technique, confirm the scope mount and rings are torqued correctly and re-verify your zero. Systematic isolation ensures that corrective actions are targeted and effective.
What Are Signs of Scope Movement or Calibration Errors?
Indicators of scope movement or calibration error include sudden, unexplained POI jumps, visible loosening of ring screws, slipping on the rail, inconsistent reticle behavior, or persistent offsets that cannot be corrected with turret clicks. Inspect hardware for loose screws, cracked rings, or rail deformation. Check for visible reticle wobble in the display and run a NUC to ensure internal calibration stability. If the unit exhibits erratic electronic behavior after these checks, document the symptoms and consider contacting manufacturer support. If mounts and hardware are secure, re-zero and validate whether the POI stabilizes. Early detection of movement prevents repeated shooting with an incorrect zero and leads into the maintenance checks described below.
How Should You Maintain Your Armasight Thermal Riflescope for Consistent Accuracy?
Maintaining your Armasight thermal riflescope involves routine cleaning, battery management, and firmware checks to ensure the integrity of the sensor, electronics, and mount remains stable over time. The underlying mechanism is preventing degradation that could lead to POI drift or inconsistent reticle behavior. The benefit is long-term zero stability and reliable field performance, supported by predictable electronic behavior and consistent power delivery. Practical routines include scheduled lens care, battery handling, periodic firmware reviews, and mount inspections. These tasks preserve your zero and reduce the need for frequent re-zeroing. Below are maintenance best practices tailored to Armasight's features and operational realities.
What Are Best Practices for Lens Cleaning and Battery Management?
Lens care requires soft, non-abrasive cleaning tools and a controlled process: remove loose debris with a blower, apply appropriate optical cleaning solution to a microfiber cloth, and wipe in a single direction to avoid smearing the sensor-facing window. Avoid household solvents and abrasive materials. Protect lenses with covers when not in use and store the unit in a dry, temperate environment to prevent condensation. For batteries, use recommended chemistries, rotate storage charge levels, and carry spares for field operations. Low battery voltage can affect display brightness and electronic stability, potentially causing inconsistent NUC behavior. Proper cleaning and battery routines keep the optical path clear and electronics stable, thereby reducing POI instability.
How Often Should Firmware Updates Be Applied?
Apply firmware updates when they contain critical fixes or performance enhancements, and check for updates on a regular cadence, such as quarterly, verifying release notes before installation. The mechanism involves resolving known defects and improving device stability, which can directly impact zeroing behavior. Before updating, back up profile settings if the device supports this function, ensure a stable power supply, and avoid interruptions during the process. After updating, perform a NUC, verify reticle behavior, and confirm your zero with a short verification group. Conservative update practices minimize the risk of unintended changes while ensuring you benefit from manufacturer improvements to stability or features.
How Does Proper Maintenance Affect Long-Term Zeroing Stability?
Consistent maintenance: including mount checks, lens care, battery routines, and periodic firmware reviews—prevents gradual POI drift caused by mechanical loosening, sensor degradation, or electronic anomalies. The link is direct, as many common POI shifts stem from neglected maintenance. A practical schedule involves verifying mount torque and performing a quick group confirmation after any transport event, checking lenses and seals seasonally, and running firmware/NUC checks quarterly or before major operations. Re-zero after any significant maintenance that affects alignment or electronics to ensure preserved accuracy. Routine maintenance therefore safeguards your validated zero and reduces unscheduled rework during critical use.
Armasight-specific maintenance pointers:
- Battery & power: Follow manufacturer guidance for storage and replacement to avoid power-related instability.
- Firmware: Check for updates periodically and follow pre-update backup steps.
- Support resources: Reference official support channels for firmware and troubleshooting guidance.
Regular maintenance directly supports the accuracy and dependability of your thermal zero.
Frequently Asked Questions
What is the importance of thermal contrast in zeroing?
Thermal contrast is vital in zeroing as it dictates how effectively the thermal scope can detect and display targets. High thermal contrast enables clearer differentiation between the target and its background, simplifying accurate reticle alignment. Inconsistent thermal contrast can lead to misalignment between the Point of Aim (POA) and Point of Impact (POI), resulting in inaccurate shots. Therefore, selecting targets with stable thermal properties is essential for effective zeroing and achieving reliable accuracy.
How can environmental factors impact the zeroing process?
Environmental factors such as temperature, humidity, and air density can significantly influence the zeroing process. For instance, temperature fluctuations can alter the thermal contrast perceived by the scope, while humidity can affect the ballistic trajectory of the projectile. These variations can cause POI discrepancies when transitioning between different environments. To mitigate these effects, it is advisable to zero the scope under conditions similar to those expected during actual use and to re-verify zero after significant environmental changes.
What are the benefits of using a ballistic calculator with thermal scopes?
A ballistic calculator enhances the zeroing process by providing precise adjustments for elevation and windage based on various factors, including bullet type, velocity, and environmental conditions. This tool empowers shooters to make informed decisions about holdovers and turret settings, especially at longer ranges where minor variations can have a substantial impact on accuracy. By integrating the outputs from a ballistic calculator with the thermal scope's reticle, shooters can achieve more reliable and consistent results in the field.
How do I know when to re-zero my thermal riflescope?
Re-zeroing your thermal riflescope may be necessary after significant changes in environmental conditions, such as temperature shifts, or after transporting the rifle. Additionally, if you observe consistent discrepancies between your POA and POI, or if you have made adjustments to the scope or its mounting, it is advisable to re-zero. Regular checks following maintenance or firmware updates are also recommended to ensure optimal scope function and accurate zero.
What are some common troubleshooting steps for zeroing issues?
Common troubleshooting steps for zeroing issues include verifying the consistency of your ammunition, ensuring the scope is securely mounted, and confirming that all mechanical components are functioning correctly. If you experience POI shifts, start by testing with a fresh lot of ammunition and confirming that the scope's mounts are torqued to specifications. Furthermore, perform a non-uniformity correction (NUC) and check for any electronic anomalies that might affect performance. Systematic elimination of these variables can help restore zero stability.
Can I use DIY thermal targets effectively for zeroing?
Yes, DIY thermal targets can be effective for zeroing if constructed properly. Utilizing materials that create a stable heat differential, such as disposable hand warmers behind dark foil, can provide clear thermal outlines for accurate reticle centering. Ensure that the targets are securely mounted and that the heat sources are consistent to avoid introducing measurement noise. While commercial targets may offer greater reliability, well-crafted DIY options can serve as a cost-effective alternative, particularly for short-range zeroing.
What maintenance practices are essential for long-term zeroing stability?
Essential maintenance practices for long-term zeroing stability include regular lens cleaning, battery management, and firmware updates. Keeping the lens clear of debris ensures optimal visibility, while managing battery health prevents power-related issues that can affect performance. Additionally, periodic checks of the scope's mounts and electronic components help maintain alignment and functionality. Establishing a routine maintenance schedule can significantly reduce the likelihood of POI drift and ensure your thermal riflescope remains dependable over time.
Conclusion
Achieving pinpoint accuracy with your thermal riflescope is fundamental for reliable shooting performance, and mastering proper zeroing techniques can dramatically enhance your first-round hit probability. By understanding the unique characteristics of thermal optics and implementing effective zeroing methods, you can ensure consistent alignment between your Point of Aim and Point of Impact. Don't hesitate to explore our comprehensive resources and guides to further refine your skills and knowledge. Begin your journey toward mastering thermal scope zeroing today!